How To Make Fall Garlands?
Fall garlands are a fun way to decorate your home for autumn! They bring the pretty colors and comfy feeling of fall inside. You can hang them on your fireplace, or walls, or use them as a centerpiece on your table. Making your garlands lets you add your style and makes them extra special. This guide will show you how to make fall garlands with lots of different things like leaves, pinecones, and pumpkins. It doesn’t matter if you’ve made crafts before or not, these instructions are easy to follow. We’ll also give you some ideas to make your garlands amazing!
Materials Needed
Fall garlands are awesome decorations that make your home feel warm and cozy. To make a great one, you need to pick the right stuff and put it together carefully. Here’s what you’ll need to get started:
- Leaves: Real or fake, in fall colors like red, orange, yellow, and brown. Maple leaves are popular, but any kind works!
- Pinecones: Find them outside or get them at a craft store. They make your garland look natural.
- Acorns & Nuts: These add some extra fun and texture.
- Mini Pumpkins & Gourds: Real or fake, they make your garland look festive like a harvest celebration!
- Fabric & Ribbons: Cut up some fall-colored fabric or ribbons to make it feel extra comfy.
- String: This will be the base for your garland. Jute string is a good choice because it looks natural.
- Pipe Cleaner Wire: This helps you attach heavier things like pinecones and pumpkins.
- Glue Gun (optional): Use this to stick things to the string base. Be careful, it gets hot!
- Scissors: You’ll need these to cut things like leaves, fabric, and string.
- Needle & Thread (optional): This is for sewing fabric or attaching delicate things (not everyone needs this).
Once you have all this stuff, you’re ready to make a beautiful fall garland! Next, we’ll show you how to get your workspace ready for crafting.
What are the Step-by-Step Instructions?
Now that you have all your cool stuff, here’s how to put it together step-by-step:
1. Get Your Space Ready:
- Find a flat, clean table to work on.
- Put down some newspaper or a tablecloth to catch any glue or mess.
- If you’re using a hot glue gun, plug it in and let it heat up.
2. Cut the String:
- Measure how long you want your garland to be, depending on where you’ll hang it.
- Cut a piece of string that long, with a little extra room at the ends for tying it up.
3. Plan Your Design:
- Lay out all your leaves, pinecones, acorns, pumpkins, and fabric so you can see them all.
- Think about how you want to arrange them on your string – spread them out evenly or bunch them together a bit.
4. Attach the Leaves:
- Start by gluing or tying the leaves to your string.
- Be careful with real leaves so they don’t rip.
5. Add Pinecones and Acorns:
- Use pipe cleaner wire to wrap around the bottom of the pinecones and acorns, then twist the wire around the string.
- You can add a little hot glue for extra hold.
6. Put on the Pumpkins and Gourds:
- Use wire or glue to attach the pumpkins and gourds to the string.
- Make sure they’re on tight, especially if they’re heavy.
7. Add Fabric and Ribbons:
- Cut your fabric and ribbons into strips or bows and tie them to the string.
- Put them between the other things on the garland for a cozy look.
8. Make Sure Everything Stays On:
- Go back over your garland and check that everything is glued or tied on well.
- Add more glue or wire if you need to.
- Cut off any extra string or fabric that’s sticking out.
9. Finishing Touches:
- Fluff up the leaves and move things around a bit to make your garland look balanced and pretty.
- Make sure there aren’t any big empty spaces or places that look crowded.
10. Hang Up Your Garland!
- Use the extra string at the ends to tie your garland up wherever you want to put it.
- Straighten it out and adjust it until it looks perfect.
Now you have a beautiful fall garland to decorate your home! Next, we’ll learn some tips on where to hang it and how to make it look even better.
Gathering and Preparing Materials
Before you start putting your garland together, here’s what to do:
Leaves:
- If you’re using real leaves, find some pretty, colorful ones outside that aren’t broken.
- If you’re using fake leaves, make sure you have enough for the whole garland.
Pinecones & Acorns:
- Find some pinecones and acorns outside that are clean and dry.
- You can also get them at a craft store.
- You can even paint them orange, yellow, or red if you want!
Mini Pumpkins & Gourds:
- If you’re using real ones, wash them and let them dry completely.
- If they’re fake, make sure they’re ready to be attached to your garland.
Fabric & Ribbons:
- Cut up some fall-colored fabric or ribbons into strips or bows.
- Make them different sizes!
Tools:
- Put your scissors, glue gun, pipe cleaner wire, and needle and thread (if you’re using them) all in one place so you can grab them easily.
By getting everything ready first, making your garland will be much easier and faster! Then, you can move on to the next step: putting it all together!
Assembling the Garland Base
Now that you have all your cool stuff ready, let’s build the main part of your garland:
1. Measure the String:
- Stretch out your string however long you want your garland to be.
- Cut it with scissors, leaving a little extra string at the ends for hanging it up.
2. Lay Down the String:
- Put the string flat on your table. This will be the base where you’ll stick all the pretty things.
3. Plan Your Design:
- Before you glue anything, lay out all your leaves, pinecones, pumpkins, and other things next to the string.
- Think about where you want to put the bigger things like pinecones and pumpkins, and spread them out evenly.
- Fill in the spaces between them with the smaller things like leaves.
4. Glue Everything On:
- Use your hot glue gun to stick each thing onto the string.
- Put a little glue on the back of each thing and press it firmly onto the string.
- If something is heavy, like a pinecone or pumpkin, use pipe cleaner wire to help hold it on too.
5. Make Layers:
- Keep adding things one at a time, working your way down the string.
- This will make your garland look nice and even, without any big gaps.
6. Check and Fix:
- As you go, take a step back now and then to see how your garland looks.
- Move things around a bit if you need to make it look balanced and pretty.
7. Let it Dry:
- Let your garland dry completely before you touch it or hang it up.
- This will make sure everything stays stuck on tight.
Now you have a strong and pretty base for your fall garland! Next, we’ll learn how to add pinecones, acorns, fabric, and other things to make it look even better.
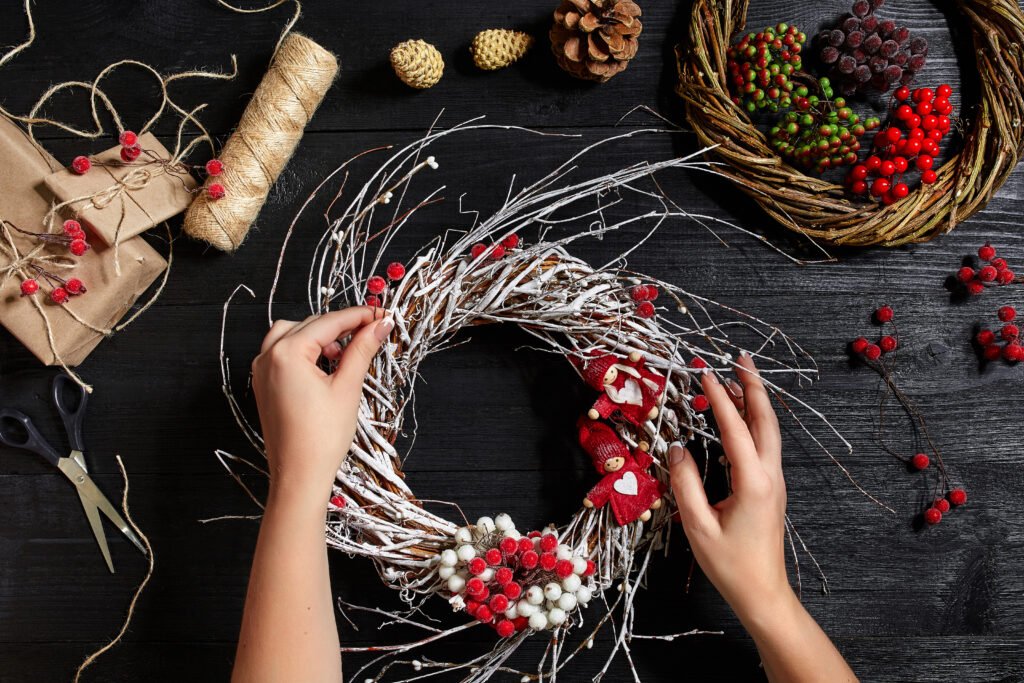
Adding Finishing Touches
Now that your garland base is ready, let’s make it look extra special:
- More Ribbons & Fabric: Cut colorful fabric or ribbon into strips or bows. Tie them onto the string between the other things for a cozy touch.
- Fancy Twists & Bows: Make cool twists or bows with your ribbon and glue them onto the string.
- Sparkle Time (Optional): Want some glitter? Sprinkle a little bit on some leaves or pumpkins. Use glue to make it stick, then let it dry completely.
- Add Your Flair (Optional): Feeling creative? Add some dried flowers or small fall decorations to your garland!
- Make Sure It Looks Nice: Take a step back now and then to see how your garland looks. Everything should be spaced out evenly.
- Fix Any Messy Bits: Check that everything is glued on tight and cut off any extra string or ribbon sticking out.
- Time to Hang It Up! Once you’re happy with your garland, hang it wherever you want! Fluff up the leaves if needed.
By adding these finishing touches, you’ve made a beautiful fall garland for your home! Next, we’ll learn some tips on where to hang it.
Maintenance and Storage
Your fall garland is beautiful! Here’s how to keep it looking great for years to come:
- Dust gently: Use a feather duster or compressed air to remove dust without damaging anything.
- Keep it out of the sun: Don’t hang your garland in direct sunlight, or the colors might fade.
- Store it safely: When you’re not using it, put your garland in a cool, dry place, like a bin or a garment bag. This protects it from dust, bugs, and getting hurt.
- Check it every year: Before fall comes again, look at your garland to see if anything is loose or broken. Fix it right away so it lasts longer.
- Be careful with it: When you move your garland, hold it all the way along so it doesn’t rip or break.
- Mostly for inside: Some garlands can be outside, but most are better for inside so they stay pretty.
By following these tips, your fall garland will look amazing for many falls to come! You’ve made a beautiful decoration for your home!
In conclusion
Making a fall garland is fun and lets you add some pretty fall colors and textures to your home! You can use colorful leaves, pinecones, and even mini pumpkins. Put them together carefully to make a decoration that celebrates fall.
You can hang your garland on your fireplace, stairs, or even a doorway. It will make your home feel warm and cozy! To keep your garland looking great, dust it gently sometimes, store it safely when not in use, and fix anything that breaks. That way, you can enjoy your fall garland for many years to come! Let your creativity flow and have fun making your home feel extra cozy for fall!
FAQs
Q: Can I use real leaves for my fall garland?
A: Yes, you can use real leaves! Just make sure they are vibrant and free from damage. If you prefer something longer-lasting, artificial leaves also work well.
Q: How do I keep pinecones and acorns from falling off my garland?
A: Use a hot glue gun or floral wire to secure heavier items like pinecones and acorns. This ensures they stay in place while maintaining a natural look.
Q: What types of fabric are best for fall garlands?
A: Fabrics like burlap or plaid in autumnal colors (reds, oranges, browns) are perfect. Cut them into strips or make bows to add a cozy, seasonal touch.
Q: How long does it take to make a fall garland?
A: The time can vary depending on the complexity of your design and the materials used. On average, plan for a few hours to gather materials and assemble your garland.